VMFS Recovery™: saving scan results to speed up repeating disk scans
Contents
- Setting up cache before scan
- Sectors and Tree parameters
- Approximate cache size
- Saving scan cache after scan is complete
- Additional logging and options
- Using previously stored scan cache
- Cleaning the settings
Modern corporate requirements set very high limits for disk capacity. It's already quite usual to see datastores and iSCSI storages over 20Tb. However, the disk read speed parameter doesn't improve corresponding to capacity growth. Adding to the picture common data recovery issues such as bad blocks or RAID corruption cuts disk read speed even more. This makes downtime because of recovery bitter or even unacceptable.
The Situation may become even worse if there is a power down or software crashes. Which requires starting the scan from scratch.
To deal with such situations VMFS Recovery company has developed and implemented a scan cache which saves pointers to file system structures and (if used during a repeating scan) allows reading from the scanned disk file system structures only. Using a scan cache will not make the process instant, as file system structures are to be read anyway. Speed up depends on the amount of file system information to be processed but you may expect to get a reduction from a couple of days to 20 minutes.
Now to the details: there are two methods to set up a scan cache. I'd recommend setting up it before a scan is started, especially if you expect any issues such as power-downs or hardware issues.
Setting up cache before scan
Please click "View->Preferences" to open VMFS Recovery™ options (keyboard short key F11) and press CTRL+E to open Developer tab.
Check "Developer mode" and specify "Write sectors" and "Write Tree" with paths to some existing folder and add a file name. Just make sure it won't write anything to the damaged disk.
Please be advised that the scan cache is set independently for each file system. So if you need to scan the VMFS disk, you need to set up a scan cache in the VMFS section.
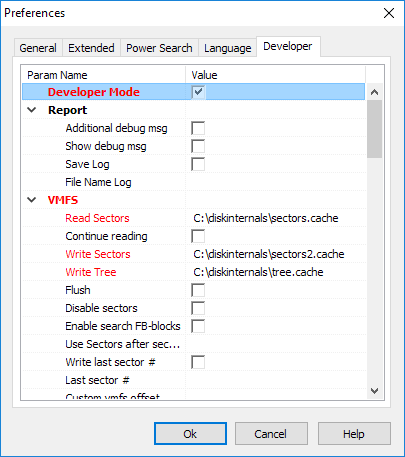
Normally we place some temporary path at the system disk like: "C:\diskinternals\sectors.cache" and "C:\diskinternals\tree.cache" or "C:\temp\sectors" and "C:\temp\tree". We use C: disk because it's normally a Windows system disk. Actual file names, extension, and folder can be changed to any that suits you.
Sectors and Tree parameters
Sectors parameter is a scan cache. It contains only pointers to the disk and doesn't have even a single bit of user information.
“Tree” parameter saves file and folder tree which is required by our developers and engineers to check the status of your case. I'd advise creating this log file just in case it would improve the investigation of your case if you would need our support. Creating a “Tree” log will not affect the performance of scan speed. Data saved in the “Tree” log contains file and folder names plus contents of small files, as contents of very small files (less than 256kb) are stored within file system contents without real disk space allocation.
Approximate cache size
Scan cache size depends on the amount of file system information on the disk. The larger the disk you are recovering data from and the more files and data it has, the larger the scan cache will be. Normally it is to be expected to be between 1-10Gb.
Saving scan cache after scan is complete
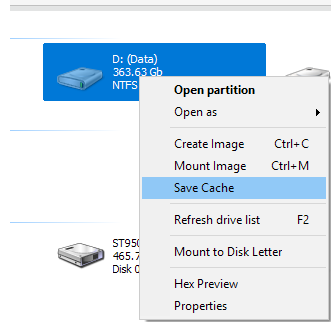
To do this you need to enable Developer mode by clicking "View->Preferences" to open options and press CTRL+E to open the Developer tab. Check "Developer mode". Now return to the disk list right-click on the previously scanned disk and select the "Save Cache" option.
Please note: should you expect any problems, it would be much better to set up a scan before the scan rather than hoping it to be finished first.
Additional logging and options
It is possible to set up additional logging about software work on the Developers page. It may be useful if you experience any software crashes. To do this specify a path with a file name at the “File Name Log” parameter, and check “Additional debug msg” and “Save Log” options.
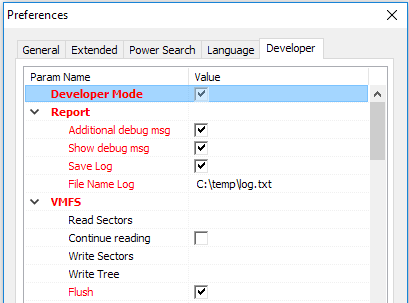
You may also find useful a “Flush” option in the sections corresponding to processed file systems. It will write any new information immediately instead of storing it in the buffer. This reduces scan performance but is valuable for bad block recognition or if there is some software crash to be fixed.
Using previously stored scan cache
In order to use the previously saved scan cache, please reopen the Developer tab as described above and specify the path to scan cache at the "Read Sectors" parameter in the corresponding section. Change “Write Sectors” parameters to use different file names.
If everything was set up correctly, you'll see the following warning message: “Sector cache
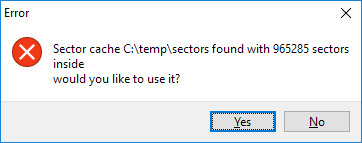
Click “Yes” to process the scan cache.
Cleaning the settings
Please be advised: scan cache will be used every time the disk with the corresponding file system is opened. Currently, there is no check for different disks and thus once up scan cache for VMFS(or any other) disk will be applied for any other VMFS disk, which will lead to incorrect results of the scan. To avoid such a situation it's important to clear all settings to default, I'd advise deleting the “FSM.ini” file to the software's directory.